Refactoring Uber’s Rider app
There was a lot of discussion at the end of 2020 about Uber’s mobile apps, largely due to a Twitter thread by McLaren Stanley. Many wondered aloud why we didn’t just refactor the app instead of rewriting it.
I thought I’d add some context into where things were prior to the rewrite.
In the beginning… #
I joined Uber in December of 2013, shortly after “Guinness” (a redesign of the app) launched. I was mobile engineer #8; I think all of engineering was around 130 people. At that time, the app had a fairly constrained feature set — "push a button, get a ride.“ Products like uberPOOL didn’t exist yet.
Trip Lifecycle #
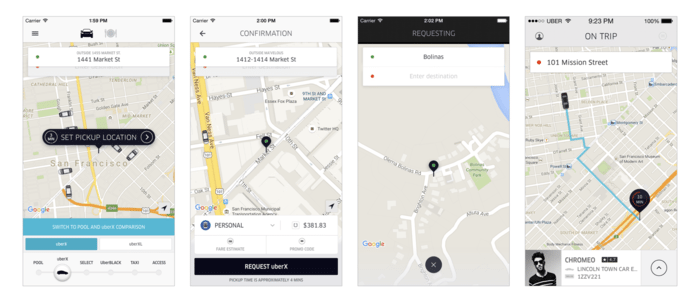
When you dig into the lifecycle of a trip, there are several steps. The "core flow” breaks down into four main ones (shown above, albeit with a more updated design than existed at the time I joined):
- Looking — you’re effectively “browsing.” You haven’t set pickup location yet (remember, prior to the 2016 redesign, pickup location was the primary entry point; before the redesign of the address bar (in 2014?) the only place destination could be entered was on the confirmation screen, and most people blew through that screen). The “Guinness” redesign introduced the product slider. When you’re “looking” you can change which product you want (Black Car, uberX, etc), and the map updates when you change your selection. As an aside: this was all controlled by the city teams. There was no global notion of “uberX” (which became extremely problematic later — another post for another time). City teams could add whatever they wanted to the slider — the tooling on the backend allowed them to provide the name, rates, and the necessary image assets for both the slider and the map; the client apps simply displayed what the server told them to. This is how city teams were able to do things like UberKITTENS without involving an app release.
- Confirming — you have set the pickup location and are on the confirmation screen. Here you can switch your payment method, get a fare estimate, enter a promo code, etc. Note: This step only exists client-side; the server doesn’t model this step (and rightfully so). Again, most users quickly clicked the “Request” button without doing much else on this screen.
- Dispatching — you hit the “Request” button on the confirmation screen and have requested a ride. Once the server gets the request, it will start matching you with a driver. We eagerly move you into this state on the client as soon as the button is tapped; it may take a few seconds for the request to hit the server and to acknowledge that this is where you should be in the sequence. You remain on this step until the server says that a driver has accepted the trip or kicks you back to “looking.” Until the redesign of the address bar launched, this screen was the black grid on which you could draw.
- On trip — a driver has accepted the trip and is en route to your pickup location, or you’re already in the car en route to your destination.
There are lots of other potential steps in the flow (e.g. surge pricing requires confirmation above a certain threshold, payment method rejected, outstanding balance due, Uber doesn’t service that area, etc.), but the ones listed above represent the typical case.
Complexity #
In the Rider app there was a class called UBRequestViewController, where most of the logic to handle these steps lived. In reality, it could have just been called UberViewController, because it contained most of the logic of the app. This made sense at the time — the team was small, the supported features were simple, etc. Over time, however, this class began to bloat. Support for additional payment methods was added (e.g. PayPal, Alipay), some of which introduced additional steps. In 2014 uberPOOL launched, which greatly increased the complexity of the app. In addition to the greatly-expanding feature set, the team also began to grow — we were adding a dozen new iOS engineers every month.
At its peak, this class contained over 6,000 lines of code.
Massive View Controller is right. pic.twitter.com/bQjPRKRHsk
— Tyler Stromberg (@aqua_geek) October 7, 2015
One of the most tenured iOS engineers on the team:
[…] we don’t say it but we are all secretly scared to ever touch the request view controller!
Essential Complexity #
Even back in 2014, there were lots of features in the app (many more than most people realize) — receipts, fare splits, push notifications, reverse geocoding, business profiles, payment methods, surge, etc. Adding support for these features has some inherent complexity.
On top of all the client-side logic, at any point a polling response can come back from the server can say, “Nope, you’re actually in state [x] now.” Keep in mind that there are certain states that only exist on the client side (e.g. confirming). Regardless of where you are in the flow, the app has to be able to properly tear down and go to the step that matches the authoritative state from the backend.
Accidental Complexity #
There was lots and lots of state to keep track of — the rider’s current status we’re showing in the app (e.g. eagerly moving to dispatching flips this to dispatching), whether a pickup request is in-flight, the last rider status we got back from the server, the driver’s status (if applicable).
UBRequestViewController had to handle all possible permutations of this state. Sometimes, we couldn’t properly reason about what should happen, so we flipped the current status to unknown and forced an update of the UI:
//set it to unknown so it resets to looking
_status = UBRiderStatusUnknown;
[self layoutForState:YES];
The method that handled this update: - (void)layoutForState:(BOOL)animated. One of the things this method had to do was clean up views when you transition between states (potentially multiple views, together), keeping in mind that some views spanned multiple states.
Behavior changed based on that state, too. Take setting a destination — when you’re “looking,” it adds a pin to the map and draws a route line; when you’re on trip, it has to make a network request to the backend so that the driver gets the updated location (in addition to adding a pin to the map and drawing a route line).
The Refactor #
All of this accidental complexity ultimately resulted in lots of bugs. It was a maddening house of cards. At a certain point, my team had had enough and wanted to do something about it. We took a multi-phase approach to fixing this.
Phase 1 was to fail, miserably. 🤣
Attempt #1 #
Our first attempt at fixing this was to duplicate the view controller and try to refactor the copy. This ultimately failed, because there was too much in flight. Our small team of 5 couldn’t keep up with the changes dozens of other engineers on other teams were making to the original, and the refactor wasn’t stable enough yet for those engineers to make the changes in both places and verify that they work.
After several weeks of trying this, we pulled the plug. It simply wasn’t going to work. The two branches of development were diverging too quickly.
I sent a message to the wider iOS team:
We learned a lot of things along the way, but duping the view controller to do the refactor in parallel instead of starting at the leaves was probably a bad choice.
Take Two #
Child View Controllers #
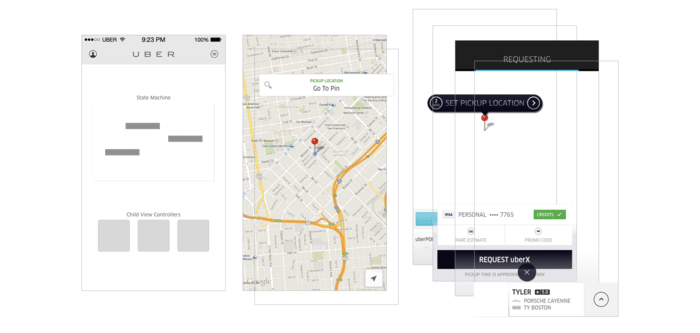
For the second attempt, we started at the leaves instead. We decided to first extract the various views that were being managed by the UBRequestViewController and move them into their own view controller subclasses. This not only reduced the complexity in the request view controller, but it also made it easier for other teams to continue to do their work — changes made in the confirming view controller, for example, could be leveraged by the old request view controller and the refactored one (once we got to the point of starting the refactor again). We were “just” moving code around.
We also split out the map and address bar into their own components (again, moving code into more focused chunks that could be reasoned about in isolation).
This work took place from November 2014 to May(?) 2015 and ultimately de-risked the eventual refactor. Teams that only needed to modify a single part of the request flow (e.g. the confirmation screen) no longer needed to reason about all 6,000 lines of code in the request view controller to surgically make their change. Instead, they could make their change in the significantly smaller child view controller that dealt with that step and have significantly more confidence that there wouldn’t be inadvertent fallout from their changes.
This also made it easier to make a distinction between “proposed changes” to the data and “committed changes” — if the rider’s input should be discarded (e.g. if they cancel out of the confirmation screen), we don’t propagate it back up to the parent container. Before, this would have required adding additional instance variables to the request view controller, remembering to look at them in certain scenarios instead of the other instance variables, and properly clearing them when they don’t apply. (We had a lot of bugs caused by updating pickup and drop-off locations at the wrong times or not resetting them properly.) By tying the existence of these variables to the step in which they apply, we simplify the management of them.
Because most of the changes being made on the regular to the request view controller were really more local changes specific to a single step, once we stood up the duplicate container view controller again in an attempt to refactor it there would be fewer changes we’d have to keep track of/support/copy over.
State Machine #
In this second attempt, we also codified the various states and transitions between them into a state machine. We mapped out all the various permutations of client-side and server-side state that we would need to represent and what transitions between them are valid. The idea was for this to become the source of truth for the app — you could query the state machine for its current state and know where you were instead of having to infer that via several instance variables and an archeological expedition into the codebase.
We also modeled intermediate states and events in the state machine. Take, for example, surge pricing. We modeled this by adding a Checking surge state that would be part of every flow. The implementation of this state would look at the product selection and the information from the server and either emit a Show surge event or Skip surge event, depending on what applied. By modeling it this way, we could easily test our logic — pass in a set of data and check the event that is emitted. More importantly, we could easily reason about our logic. Need to change how we handle surge? There’s one place to do it. From the outside, as long as you ensure the Checking surge state is part of the state machine and that the two possible outputs are handled, you can be reasonably confident that surge is handled correctly.
Modeling everything in a state machine also simplified our cancelation logic as well as “server says you’re [here] instead” handling — those are both modeled as events, and the transitions defined for those (current state, event) pairs define where we go when they happen.
At one point in this process, the state machine looked like this:
Downsides #
State machines have downsides. The failure mode is very unforgiving — if we failed to model a transition or the UI got out of sync, the app would get stuck in a state with no way out. The state machine doesn’t care how many times you smash the button if there’s no valid transition defined.
This happened before the surge flow was completely built out. The surge screen didn’t show (even though the state machine had transitioned and expected it to be showing). Consequently, subsequent taps on the “Set pickup location” button on the “looking” screen that was still being shown did nothing. The app was stuck. We caught this before it made it to our internal release, but it could have been a disaster.
Extensive test coverage helped alleviate some of our fears. We also leveraged visual inspection of the graph — I created some tooling to dump the state machine into a .dot file and we rendered a PNG of it. If there’s a node with no “exit,” you have a problem.
There were still concerns when we went live.
UBRideFlowViewController #
Once the state machine was built out, we duplicated what was left of the request view controller (again) and began the process of refactoring it to be driven by the trip state machine instead of its grab bag of instance variables. This new view controller was called UBRideFlowViewController. The refactor of it took from June 2015 to November 2015.
So, all in, this refactor took an entire year.
Modes #
One of the other major changes we made in the refactored view controller was to add one more layer of indirection between the child view controllers and the container view controller/state machine.
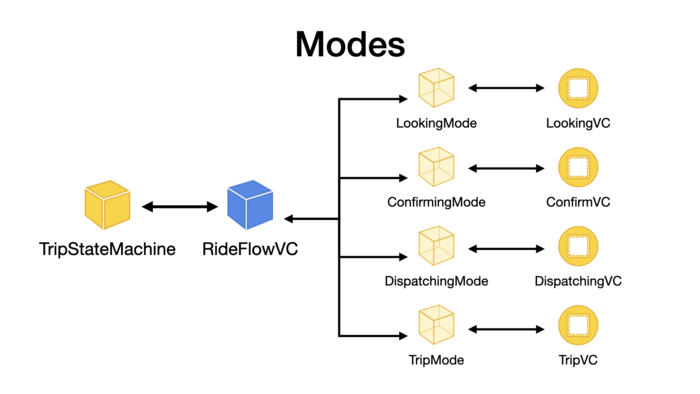
Some states are represented the same way on the client — for example, dispatch pending (the client-side-only optimistic move to dispatching) and dispatching → dispatching; waiting for pickup, driver arriving, and en route to destination → on trip. We introduced the concept of “modes” as a superset of the state machine states that represented what state the ride was in — there was a n:1 relationship between state machine states and ride flow modes.
Among other things, this allowed us to delegate some of the logic to the modes instead of the parent view controller. Remember the example mentioned above of setting the destination location? Modes that don’t allow setting the destination simply don’t have to handle this. The Looking mode only adds a pin and a route line; the Trip mode does that in addition to sending the destination to Uber’s servers so it can be relayed to the driver. All of this logic now exists in the modes instead of if/else statements littering the parent view controller. In general, I’m a big fan of this technique of replacing switch statements with polymorphism. It reduces complexity in the view controller and makes things easier to test (mock the dependencies in the mode and invoke the various functions).
Modes serve as a shim between the ride flow view controller and the child view controllers. When we created the child view controllers, we ended up defining delegate protocols for each of them to be able to communicate with the parent ride flow view controller. The ride flow view controller, however, only cares about the TripViewController‘s delegate callbacks when we’re in that mode. With the creation of modes, we moved that delegate conformance into the modes themselves.
In the end, modes ended up being responsible for the setup and teardown of their UI as well as handling view controller callbacks. One of the changes we made as far as teardown goes was to make each mode not have to worry about cleaning up what was there before — that is the job of the previous mode. No more need to call something along the lines of [self resetAllTheThings]! Each mode can assume that they are given a blank slate to use. This did limit what we could do with transitions and animations (it’s harder to synchronize them when they span two different modes). There’s also a whole Z-ordering thing that also came into play because of the child view controllers — it was hard to get everything to be positioned at the correct depth and not overlap something it shouldn’t.
Compromises #
We made some short-term compromises in the name of getting modes wired up and working and limiting the scope of the refactor.
We created UBRideFlowViewController+Internal.h where certain private methods were exposed to the modes. Ideally, we would have refactored those pieces out into separate types instead of just exposing these APIs on the parent view controller, but there was still so much to do that this was good enough.
We added a comment at the top of that file:
// DO NOT ADD ANYTHING ELSE TO THIS FILE
This is not a great means of enforcement, but it at least makes people aware of the intent. I’d highly recommend you leverage tooling (linters, etc) to enforce things like that instead.
There were other things that we wanted to change but doing so was too invasive — they would have required changes to the child view controllers (and consequently to the UBRequestViewController). Most of those changes were never done, but the refactored view controller ultimately didn’t live long enough for that to matter. 🤷♀️
Rollout #
Once all of this work was done, it was time to roll it out. Safety was key — we didn’t want to be responsible for someone not being able to get a ride home at 2am. (We also didn’t want to get a phone call from the director of mobile because the app wasn’t working for TK.)
We started with turning it on for testing by the team involved in the refactor. Once we were confident that things were working correctly, we started rolling it out to the company at large. We addressed a few issues that came out of our company internal testing and then used a feature flag rollout to several cities in production. From there, we did a wide-scale rollout to the global population. 🎉
Results #
The main view controller went from >6,000 LOC to around 3,000. That’s still higher than we wanted, but at least there was no more confusion around what state the app should be in. There was now significantly better test coverage, and it was easier to make changes and ultimately ship new features to customers.
Fire 🔥 #
We burned the old code. Literally. We printed it out, took a trip out to Sunset Beach, and burned it in a bonfire pit so it would never haunt us again.


